Using simple hardware and software, this post will show you how to extract and analyze the firmware of a GL.iNet GL-B1300 router. Identifying UART pins and connecting a JTAGulator will allow us to transmit and receive through the serial connection, access the U-Boot bootloader, and get a root shell on the main filesystem, allowing us to extract the firmware from memory.
What you’ll need
- A device to receive and transmit via UART (we’ll be using Joe Grand’s JTAGulator because of its robustness, but an Attify Badge, BUS Pirate, or a $15 USB to TTL Serial Cable will do as well)
- A router (in this example we’ll be using the GL.iNet GL-B1300 Home Router)
Identifying UART pins on the board
Accessing the main board on the router was fairly easy. Pulling off the rubber feet from the bottom of the router case exposes four small phillips-head screws. Once the screws were out, I had direct access to one side of the board as shown in this image:
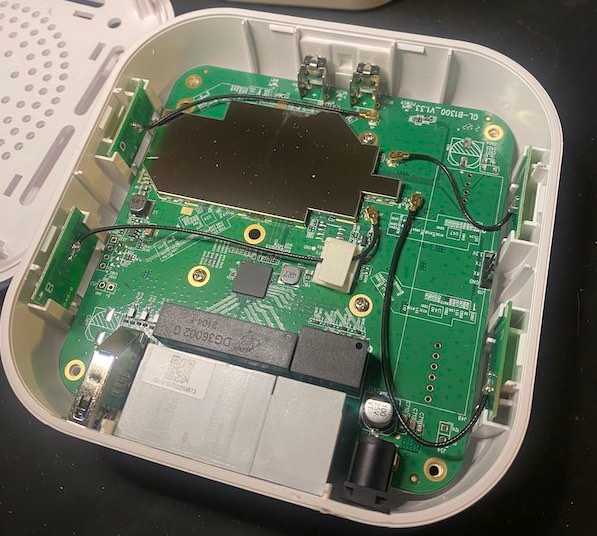
Carefully pull the wifi antennas from the sides, unscrew the two screws that are securing the board to the other side of the casing, remove the shielding, and pull the board out of the case.
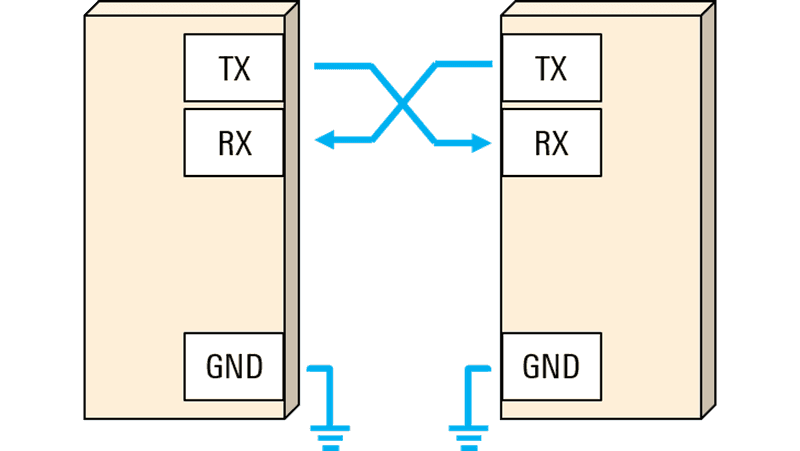
UART (universal asynchronous receiver-transmitter) is what we’ll use to transmit and receive data to and from the router. Since UART on its own (one without a data bus) only has RX, TX, and some sort of power (usually labeled GRND or not labeled at all), it’s typically pretty easy to find on a device like this - other devices might be more difficult.
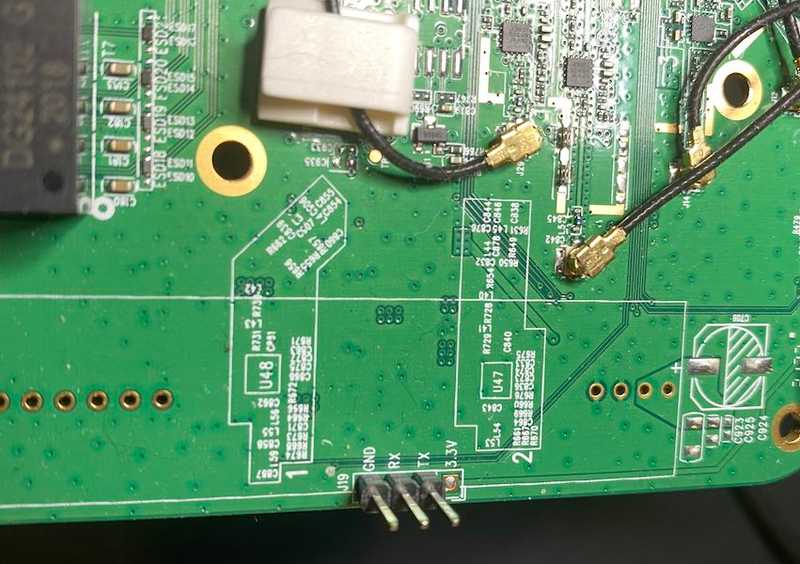
On the edge of the board three conveniently labeled pins are sticking up: GND, RX, and TX.
Connecting to UART
Any piece of hardware that can be used to connect to UART is going to work slightly different, though it’s a little pricey, the JTAGulator is my favorite choice for debugging on-chip interfaces. However, any device that supports TTL to USB (like the Attify Badge, BUS Pirate, etc.) should work just fine.
NOTE: If you’re using a JTAGulator, make sure that you install the latest firmware before moving forward
Plug the JTAGulator USB into your host machine and open a terminal to find what tty interface the JTAGulator is running on:
ls /dev/tty*usb*/dev/tty.usbserial-AB0P6L9OThen connect to it using:
screen /dev/tty.usbserial-AB0P6L9O 115200- Press the reset button on the JTAGulator to see it boot up in the terminal. If you’re not seeing anything on the screen, try pressing CTRL+X.
Info → If at any time during this process you get frozen inside screen, open another terminal and type killall screen, then enter the screen connect command again, press CTRL+X.
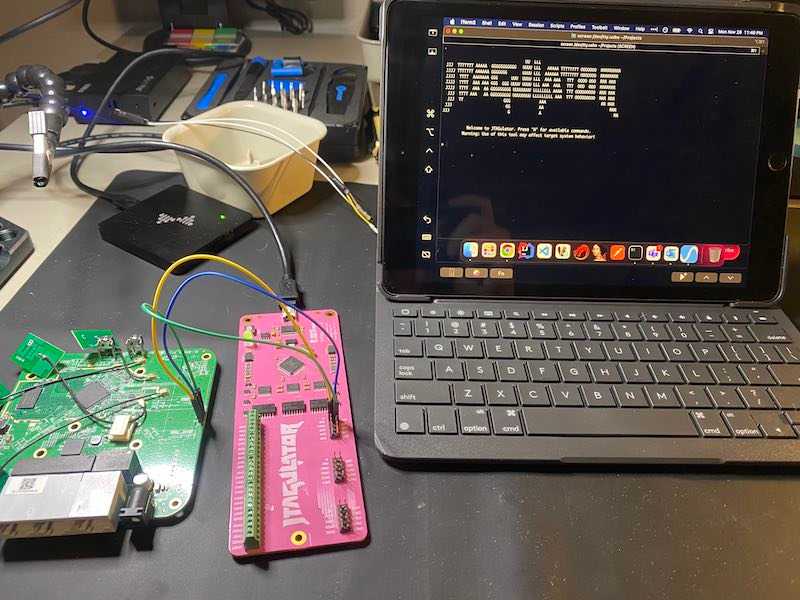
The JTAGulator has 3 GRND’s and 24-channels - we’ll take 3 jumper cables and attach them to GND, CH0, and CH1 as shown here:
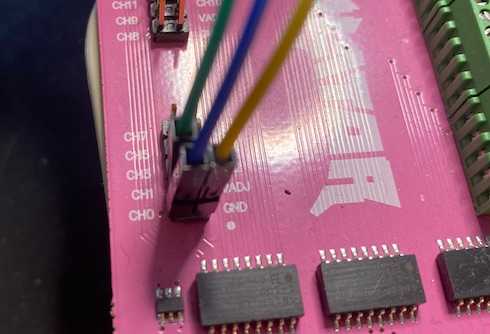
Then take the other end of the jumper cables and add them to the marked channels on the router. The full assembly should look something like this:
Because the UART pins and output voltage (3.3v displayed right under the UART pins) are clearly labeled, we can go straight into UART passthrough mode on JTAGulator which will let us interact with the router. This is what it looks like:
Info → If the UART pins are not clearly labeled, the JTAGulator has a mode called Identify UART pinout which cycles through various configurations and baud to find the most likely setup for the device.
Poking around the Linux file system
After letting the router completely boot up, we are given a root shell. Since this router runs on OpenWRT, it’s not going to be locked down or encrypted, though some routers (especially enterprise-ish ones) might have some security mechanisms in place that make it harder to get a root shell.
As shown above, some good places to look to find what capabilities we have are:
ls /binls /sbinls /usr/binls /etc
Some other useful commands might be searching the filesystem for any .pem files:
find . -type f -name "*.pem*"./etc/lighttpd/server.pem
./etc/openvpn/cert/dh1024.pemhead ./etc/lighttpd/server.pem-----BEGIN PRIVATE KEY-----
MIIEvQIBADANBgkqhkiG9w0BAQEFAASCBKcwggSjAgEAAoIBAQDSnEJL9ymbUrPj
iOwFAKIiJcobxQRPbr9qGCWJNP1wpep/dz6GOWWBAmSL/E2Dy0MNoyVfDD7sl+F8
jbK+frARzPwPavgDbA1LVwInV2sVTSd88JDrmI3gby2hnpQRRh3zVEmJUvTop60q
I977iid9yckoNFSdikI0adF/CEdrVQ9qZILaJFJ0XCvfF1N2YsxT/QHLZ6oM9QuV
EflIKQQb8YTr6XSwvX8uwsUNBu44+5PIoYvBlZYL38pYRXTY/d8vXdUNE9uG1Ewq
4IQxMiEQ7mPSpliaig3LVhMsBB74fjx73a4QCy1sQ0gA2CCl7HKIDzRfXljWUude
NL2AqOJbAgMBAAECggEAPYwMk8aXEh0JFOVek9erie8hMRxSNiRXK9oCniYuKk1S
Sg2+59q+HwVj/MSuomU0IzgaI7ygZuO7sXp3UdQUAB+3SYopEFbzS6ERsA2L7Z2u
fISQ1UivrXbQDvsYqjOjbQiktMzZZWQa5sW01C17fPcLIgSo9aEB1+9UmZsBxAt/Or maybe instead of looking for filenames, you want to search for text inside the files:
grep -rnw . -e 'PRIVATE'Binary file ./usr/sbin/hostapd matches
Binary file ./usr/sbin/tor matches
Binary file ./usr/sbin/tcpdump matches
Binary file ./usr/lib/libmbedcrypto.so.2.12.0 matches
Binary file ./usr/lib/libcrypto.so.1.1 matches
Binary file ./usr/lib/gl/libovpnapi.so matches
./usr/share/misc/magic:11718:0 string SSH\ PRIVATE\ KEY OpenSSH RSA1 private key,
./usr/share/misc/magic:11720:0 string -----BEGIN\ OPENSSH\ PRIVATE\ KEY----- OpenSSH private key
./usr/share/misc/magic:11729:0 string -----BEGIN\ RSA\ PRIVATE PEM RSA private key
./usr/share/misc/magic:11730:0 string -----BEGIN\ DSA\ PRIVATE PEM DSA private key
./usr/share/misc/magic:11731:0 string -----BEGIN\ EC\ PRIVATE PEM EC private key
./etc/lighttpd/server.pem:1:-----BEGIN PRIVATE KEY-----
./etc/lighttpd/server.pem:28:-----END PRIVATE KEY-----
Binary file ./etc/tertf/mac_vendor.db matches
Binary file ./lib/modules/4.4.60/umac.ko matches
Warning → running search commands like the above grep command is going to be extremely slow on some devices, especially if you specify the filesystem / directory. You may want to wait until we extract the firmware and explore the filesystem on your native machine.
Copying the firmware to host system
I failed many times when attempting to copy the firmware to my host system, these failures are outlined below in the Other methods of firmware extraction and why they didn’t work for me section. So I started looking around the board for the memory chip.
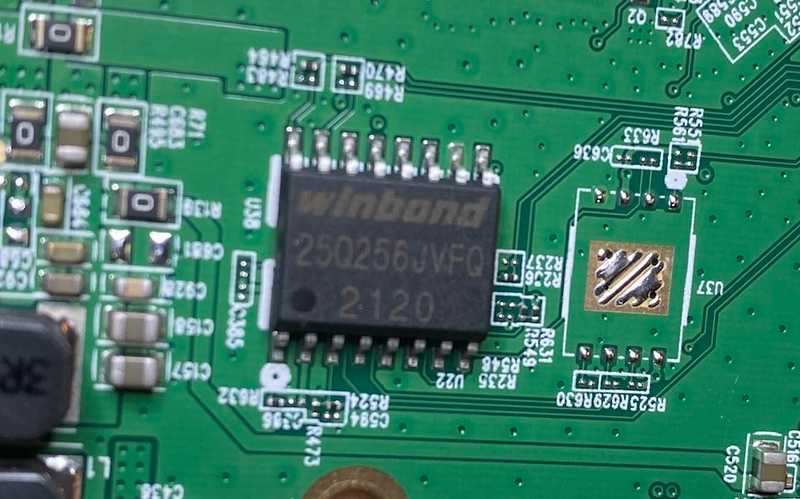
After looking up the datasheet for this winbond 255Q256JVFQ I realized that this chip is a “3v 256MB Serial Flash Memory…“. I researched how linux works with flash memory and found this article on coresecurity.com which describes getting a list of all MTD blocks (memory technology device, used for interacting with flash memory) that a system has:
cat /proc/mtddev: size erasesize name
mtd0: 00040000 00010000 "0:SBL1"
mtd1: 00020000 00010000 "0:MIBIB"
mtd2: 00060000 00010000 "0:QSEE"
mtd3: 00010000 00010000 "0:CDT"
mtd4: 00010000 00010000 "0:DDRPARAMS"
mtd5: 00010000 00010000 "0:APPSBLENV"
mtd6: 00080000 00010000 "0:APPSBL"
mtd7: 00010000 00010000 "0:ART"
mtd8: 00400000 00010000 "0:HLOS"
mtd9: 01a80000 00010000 "rootfs"
mtd10: 00950000 00010000 "rootfs_dataThe largest block is rootfs at /dev/mtd9, this is most likely going to be the filesystem. We can extract just that one block, or we can extract all of the blocks listed to perform further analysis.
If you have a router that has a USB port that mounts to /mnt, the easiest thing to do is to run something like: cp -av /dev/mtd9 /mnt/sda/output.bin for just the filesystem or cp -r /dev/mtd* /mnt/sda/output.bin for all blocks to copy to USB.
Depending on how large the blocks are and how much memory the router has, this could take a few minutes.
If your router doesn’t have a USB port, but you’re able to get on the same network as the router, you can open a netcat listener on your host machine: nc -l 1337 | dd of=./output.bin, then type the following command into the router UART terminal: dd if=/dev/mtd9 | nc <internal host IP> 1337 - this will pipe the response of the mtd9 file to our host computer listening on port 1337.
On the router serial communication output you should see:
dd if=/dev/mtd9 | nc 192.168.8.212 133754272+0 records in
54272+0 records out
27787264 bytes (26.5MB) copied, 20.743084 seconds, 1.3MB/sAnd on the receiving machine you should see:
nc -l 1337 | dd of=./output.bin45918+16182 records in
54272+0 records out
27787264 bytes transferred in 23.180080 secs (1198756 bytes/sec)If you wanted all of the blocks, you can copy one block at a time through nc, then on the host, run something like cp -r ./mtd*.bin ./output.bin to combine them into one file.
Using binwalk to extract the firmware contents
Now that we have an output.bin file that has the raw firmware in it, we can use binwalk to analyze the firmware contents.
Info → There are some important dependencies that binwalk requires to be able to extract different filesystems - follow their Quick Start Guide for installation steps.
When using binwalk to extract firmware contents, especially for non-open-source routers, there’s a chance that the firmware might be encrypted or compressed (compression can be taken care of by binwalk, encryption can’t). We can check this by running binwalk -E output.bin, giving us an output that looks like this:
And an image that looks like this:
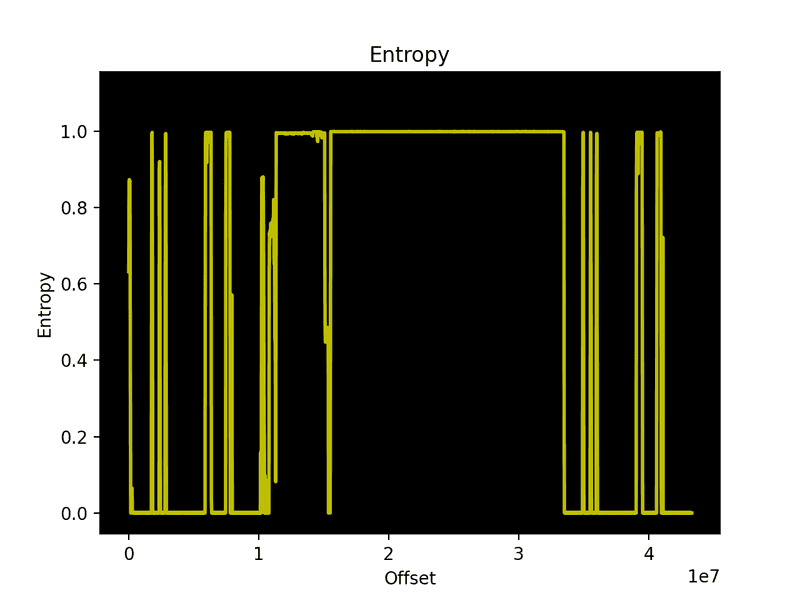
An encrypted or compressed firmware would have most, if not all, entropy around the 1.0 mark. This firmware has a lot of rising and falling entropy lines, meaning it’s most likely not encrypted or compressed.
Now we can run a binwalk extract by typing binwalk -e output.bin and see that we have a directory with the extracted contents, and the router’s linux filesystem in a directory called squashfs-root:
Info → If you extracted all of the mtd blocks like I did, but don't want to use binwalk on the whole file, you can use the following command to carve out the part you want extract: dd if=output.bin of=test.bin bs=1 skip=15532032 count=17965988 (this can take a while). 15532032 is the starting point of the extraction, and 17965988 is the size of what we want to extract. Both of these values are retrieved through the binwalk output shown above.
Other methods of firmware extraction (and why they didn’t work for me)
U-Boot mode’s md command
While the router is booting up, wait for the text Hit "gl" key to stop, type gl to enter the U-Boot bootloader shell. Typing h gives a list of commands we can run.
Info → The list of available commands might differ from router to router, even though they both might use U-Boot.
Typing smeminfo gives us a list of all allocated partitions and their memory information:
smeminfoflash_type: 0x6
flash_index: 0x0
flash_chip_select: 0x0
flash_block_size: 0x10000
flash_density: 0x2000000
partition table offset 0x0
No.: Name Attributes Start Size
0: 0:SBL1 0x0000ffff 0x0 0x40000
1: 0:MIBIB 0x002040ff 0x40000 0x20000
2: 0:QSEE 0x0000ffff 0x60000 0x60000
3: 0:CDT 0x0000ffff 0xc0000 0x10000
4: 0:DDRPARAMS 0x0000ffff 0xd0000 0x10000
5: 0:APPSBLENV 0x0000ffff 0xe0000 0x10000
6: 0:APPSBL 0x0000ffff 0xf0000 0x80000
7: 0:ART 0x0000ffff 0x170000 0x10000
8: 0:HLOS 0x0000ffff 0x180000 0x400000
9: rootfs 0x0000ffff 0x580000 0x1a80000To extract the firmware from memory, you may be lucky enough to run the md command to view the memory straight from U-Boot mode. We can start reading some bytes (10 bytes, then 40 bytes, then 50 bytes), starting at address 0x580000:
md 0x580000 1000580000: ab957e0d 001f6b00 00000001 00000000 .~...k..........
00580010: 00000000 80000000 00000000 00000000 ................
00580020: 00000000 00000000 00000000 00000000 ................
00580030: 00000000 00000000 00000000 00000000 ................md 0x580000 4000580000: ab957e0d 001f6b00 00000001 00000000 .~...k..........
00580010: 00000000 80000000 00000000 00000000 ................
00580020: 00000000 00000000 00000000 00000000 ................
00580030: 00000000 00000000 00000000 00000000 ................
00580040: 00000000 00000000 00000000 00000000 ................
00580050: 00000000 00000000 00000000 00000000 ................
00580060: 00000000 00000000 00000000 00000000 ................
00580070: 00000000 00000000 00000000 00000000 ................
00580080: 7a931a07 001f6b00 00000001 00000000 ...z.k..........
00580090: 00000000 00000000 00000000 00000000 ................
005800a0: 00000000 00000000 00000000 00000000 ................
005800b0: 00000000 00000000 00000000 00000000 ................
005800c0: 00000000 00000000 00000000 00000000 ................
005800d0: 00000000 00000000 00000000 00000000 ................
005800e0: 00000000 00000000 00000000 00000000 ................
005800f0: 00000000 00000000 00000000 00000000 ................md 0x580000 5000580000: ab957e0d 001f6b00 00000001 00000000 .~...k..........
00580010: 00000000 80000000 00000000 00000000 ................
00580020: 00000000 00000000 00000000 00000000 ................
00580030: 00000000 00000000 00000000 00000000 ................
00580040: 00000000 00000000 00000000 00000000 ................
00580050: 00000000 00000000 00000000 00000000 ................
00580060: 00000000 00000000 00000000 00000000 ................
00580070: 00000000 00000000 00000000 00000000 ................
00580080: 7a931a07 001f6b00 00000001 00000000 ...z.k..........
00580090: 00000000 00000000 00000000 00000000 ................
005800a0: 00000000 00000000 00000000 00000000 ................
005800b0: 00000000 00000000 00000000 00000000 ................
005800c0: 00000000 00000000 00000000 00000000 ................
005800d0: 00000000 00000000 00000000 00000000 ................
005800e0: 00000000 00000000 00000000 00000000 ................
005800f0: 00000000 00000000 00000000 00000000 ................
00580100:data abort
pc : [<87343524>] lr : [<87343508>]
sp : 8706fd38 ip : 00000000 fp : 00580100
r10: 00580100 r9 : 00000000 r8 : 8706ff4c
r7 : 8706fd54 r6 : 00000010 r5 : 00000004 r4 : 00000004
r3 : 00000204 r2 : 00000001 r1 : 00000000 r0 : 00000009
Flags: nZCv IRQs off FIQs off Mode SVC_32
Resetting CPU ...
resetting ...For some reason pulling blocks of memory like this after a certain point always triggers a CPU reset and causes the system to crash and reboot.
Writing the contents of /dev/mtd9 to stdout and writing stdout to a file using picocom
Another possible method of extracting firmware is to pipe the firmware out to stdout via cat and save the output to a file on our host. To do this, we can use picocom.
Kill the JTAGulator screen session by typing killall screen and connect to the JTAGulator using the following:
picocom --b 115200 --logfile output.bin /dev/tty.usbserial-AB0P6L9OYou’ll see the same JTAGulator prompt that we saw before, so you’ll go through and set everything up for connecting to UART like before. Then type BUT DON’T PRESS ENTER cat /dev/mtd9
Keeping the picocom window open, and the command typed in, open a finder window to the output.bin file being written to on your computer, you should see all the output from the serial connection, setting up JTAGUlator, etc. - clear out all of the contents so it becomes a blank file and save it. Go back to your picocom terminal and press ENTER. You’ll see the raw data from mtd9 streaming across the terminal, and you should see the output.bin file grow in size every second as more data is added to it. This is a slow process, taking ~15 minutes to copy ~30mb. This is what the whole process looks like:
Once the stdout pipe is done, you should have a file that contains the firmware. The reason this method didn’t work for me is this router is quite chatty on stdout, it constantly writes status updates out to the terminal, which ends up corrupting the datastream coming from cat.